说明
当前使用 Centos7中的yum 快速搭建Redis
步骤
- 执行
yum search redis查找源 - 执行
yum -y install redis安装redis - 执行
rpm -ql redis查找redis安装位置并更改/etc/redis.conf配置文件 - 执行
systemctl enable redis设置开机启动 - 执行
systemctl start redis启动Redis并执行systemctl status redis检查Redis状态 - 执行
firewall-cmd --permanent --add-port=6379/tcp端口加入防火墙 - 使用RDM工具连接测试或者进入redis程序目录查看状态
详细步骤
1、查找当前配置的yum源有哪些redis包
yum search redis
- 笔者当前使用的阿里的yum源,搜索结果如下,可以看到有个
redis.x86_64的包 - 更换当前系统yum可查看教程点击查看
[root@localhost system]# yum search redis
已加载插件:fastestmirror
Loading mirror speeds from cached hostfile
 * base: mirrors.aliyun.com
 * epel: mirrors.yun-idc.com
 * extras: mirrors.aliyun.com
 * updates: mirrors.aliyun.com
================================================= N/S matched: redis =================================================
collectd-redis.x86_64 : Redis plugin for collectd
...
redis.x86_64 : A persistent key-value database

  名称和简介匹配 only,使用“search all”试试。
2、安装Redis
yum -y install redis
[root@localhost system]# yum -y install redis
已加载插件:fastestmirror
Loading mirror speeds from cached hostfile
 * base: mirrors.aliyun.com
 * epel: mirrors.yun-idc.com
 * extras: mirrors.aliyun.com
 * updates: mirrors.aliyun.com
正在解决依赖关系
...

总下载量:544 k
安装大小:1.4 M
Downloading packages:
redis-3.2.12-2.el7.x86_64.rpm                                                                  | 544 kB  00:00:00
Running transaction check
Running transaction test
Transaction test succeeded
Running transaction
  正在安装    : redis-3.2.12-2.el7.x86_64                                                                         1/1
  验证中      : redis-3.2.12-2.el7.x86_64                                                                         1/1

已安装:
  redis.x86_64 0:3.2.12-2.el7

完毕!
3、看看Redis安装到了哪些目录以及配置文件所在目录
rpm -ql redis
redis.conf重点关注这个文件所在位置vim /etc/redis.conf编辑文件修改以下几个位置
bind 127.0.0.1 改为 bind 0.0.0.0监听本机所有端口daemonize no 改为 daemonize yes开启守护进程requirepass foobared 改为 requirepass 你的密码修改密码
- 修改完成后保存文件。
[root@localhost system]# rpm -ql redis
/etc/logrotate.d/redis
/etc/redis-sentinel.conf
/etc/redis.conf
/etc/systemd/system/redis-sentinel.service.d
/etc/systemd/system/redis-sentinel.service.d/limit.conf
/etc/systemd/system/redis.service.d
/etc/systemd/system/redis.service.d/limit.conf
/usr/bin/redis-benchmark
/usr/bin/redis-check-aof
/usr/bin/redis-check-rdb
/usr/bin/redis-cli
/usr/bin/redis-sentinel
/usr/bin/redis-server
...
4、设置开机启动
systemctl enable redis开启默认开机启动
[root@localhost system]# systemctl enable redis
Created symlink from /etc/systemd/system/multi-user.target.wants/redis.service to /usr/lib/systemd/system/redis.service.
- 如需要关闭开机启动,可执行这个
systemctl disable redis
[root@localhost system]# systemctl disable redis
Removed symlink /etc/systemd/system/multi-user.target.wants/redis.service.
5、启动并检查状态
systemctl start redis、systemctl status redis
- 看到绿色的
Active: active (running)表示启动成功
[root@localhost system]# systemctl start redis
[root@localhost system]# systemctl status redis
● redis.service - Redis persistent key-value database
   Loaded: loaded (/usr/lib/systemd/system/redis.service; enabled; vendor preset: disabled)
  Drop-In: /etc/systemd/system/redis.service.d
           └─limit.conf
   Active: active (running) since 六 2020-05-30 22:30:11 CST; 6s ago
 Main PID: 2566 (redis-server)
   CGroup: /system.slice/redis.service
           └─2566 /usr/bin/redis-server 0.0.0.0:6379

...
6、若服务器开了防火墙记得把6379端口加入防火墙,没有可跳过此步骤。
- 查询是否开启防火墙
systemctl status firewalld - 查询端口是否存在
firewall-cmd --query-port=6379/tcp - 放开6379端口
firewall-cmd --permanent --add-port=6379/tcp - 重启防火墙
firewall-cmd --reload
[root@localhost system]# systemctl status firewalld
● firewalld.service - firewalld - dynamic firewall daemon
   Loaded: loaded (/usr/lib/systemd/system/firewalld.service; enabled; vendor preset: enabled)
   Active: active (running) since 六 2020-05-30 17:30:14 CST; 5h 4min ago
     Docs: man:firewalld(1)
 Main PID: 707 (firewalld)
   CGroup: /system.slice/firewalld.service
           └─707 /usr/bin/python -Es /usr/sbin/firewalld --nofork --nopid

...

[root@localhost system]# firewall-cmd --query-port=6379/tcp
no
[root@localhost system]# firewall-cmd --permanent --add-port=6379/tcp
success
[root@localhost system]# firewall-cmd --reload
success
7、工具连接测试
命令行测试
ss -nlp | grep redis查询Redis监听端口- 进入redis安装目录测试
cd /usr/bin/目录执行以下操作验证,auth后面跟着你设置的密码
[root@localhost system]# ss -nlp | grep redis
tcp    LISTEN     0      128       *:6379                  *:*                   users:(("redis-server",pid=2566,fd=4))
[root@localhost system]# cd /usr/bin/
[root@localhost bin]# redis-cli
127.0.0.1:6379> auth 1234567890
OK
127.0.0.1:6379> get keys
(nil)
127.0.0.1:6379> set 111 test
OK
127.0.0.1:6379>
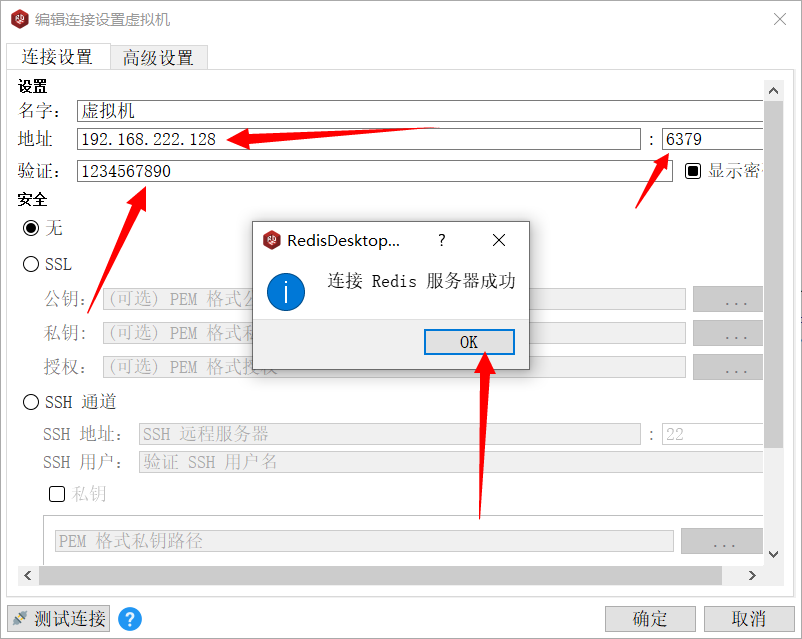
- 工具测试